文档维护人:木木(linqh@authine.com)
# Sentry
Sentry是一个比较成熟的监控上报系统,可以帮助我们追踪和管理上线的代码问题,支持很多主流编程语言的接入,具体可以看Github。
Sentry WebSite | Sentry Source Code[Github]
直入主题,说说我们的项目正常如何接入我们的Sentry系统,这里就以Vue项目接入为主。
# 环境信息
TIP
我们内部是自己部署Sentry,目前有三套环境
Sentry登录注意平台地址,别混肴了,地址分别为:
Sentry开发环境:https://sentry.devoa.h3yun.net/auth/login/sentry/
Sentry测试环境:https://sentry.testoa.h3yun.net/auth/login/sentry/
Sentry生产环境:https://sentry.techoa.h3yun.net/auth/login/sentry/
任何更改都要遵循以下顺序,保证生产环境稳定:
开发->测试->生产
# 效果图
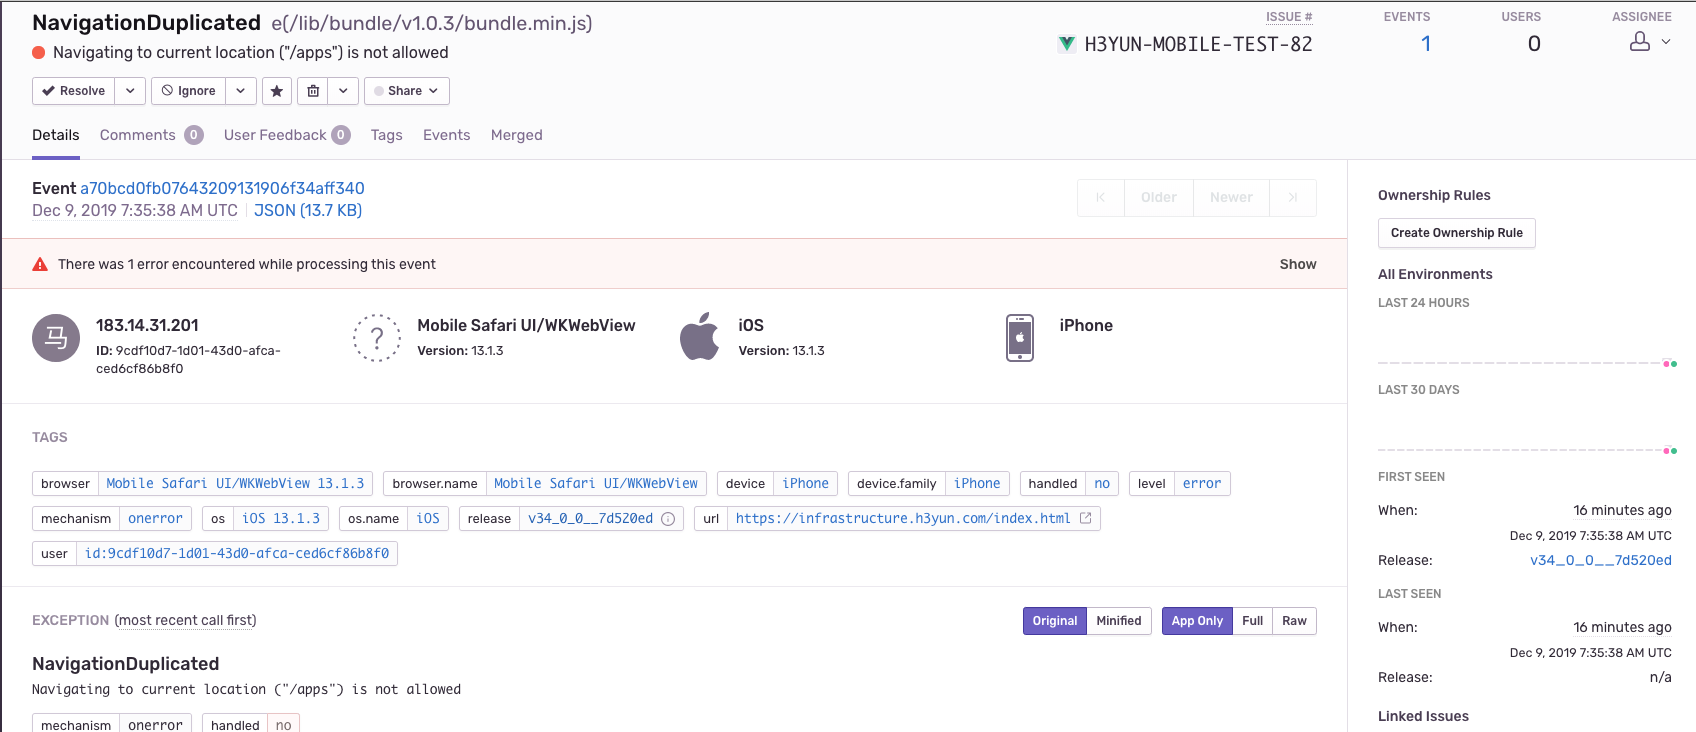
# 项目接入
# Sentry创建项目
正常来说,项目不可能是独立存在的,所以正常的姿势,效果图如下
- 创建一个团队(Team)
- 成员管理(Member)
- 新建项目(Project)
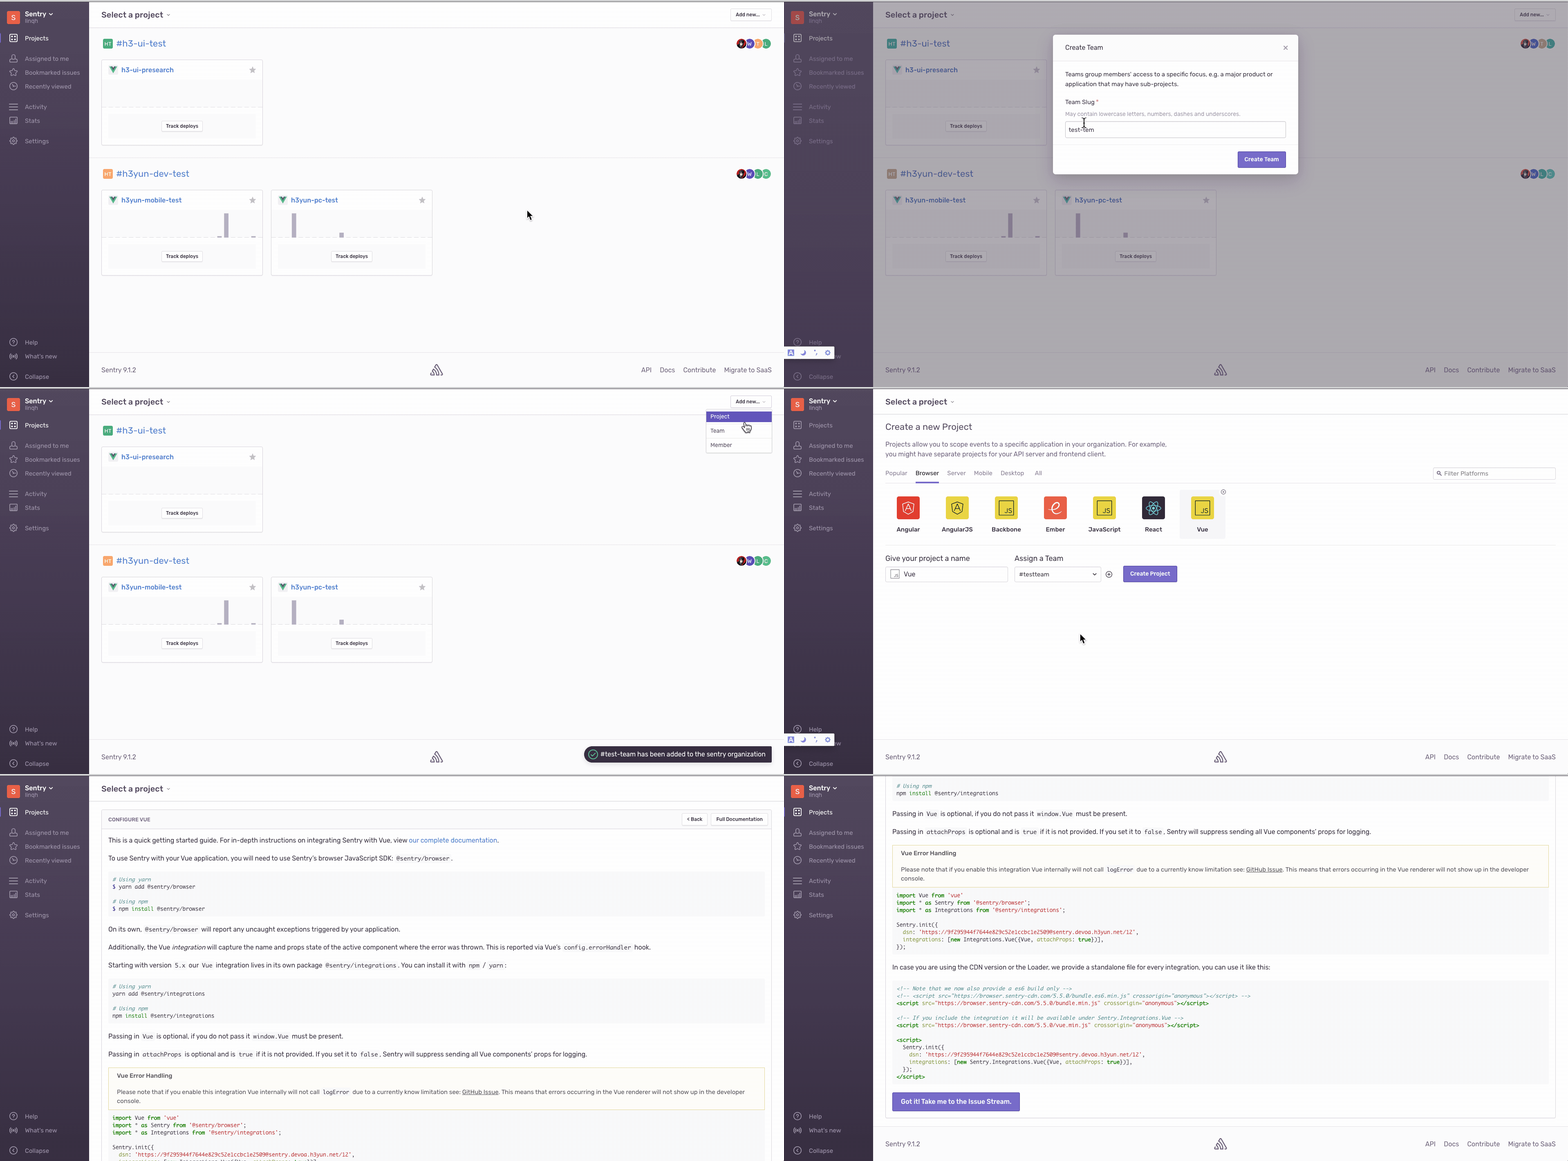
如图所示,创建一个项目是很简单的,那如何接入项目呢?
# Sentry接入Vue
# 安装客户端依赖
# Using yarn
$ yarn add @sentry/browser @sentry/integrations

# Using npm
$ npm install @sentry/browser @sentry/integrations
2
3
4
5
# 代码中初始化
import Vue from 'vue'
import * as Sentry from '@sentry/browser';  // 这个是Sentry客户端的核心

// 这是针对某框架或语言提供的封装,比如在 vue 中,sentry 对 vue 的Vue Error Handling做了改造
// 提供比较全面的 vue 信息上报
import * as Integrations from '@sentry/integrations';


Sentry.init({
  // 这个是上报的项目映射信息
  // 这里的链接就是 sentry 初始化项目提供的唯一 key
  dsn: 'https://9f295944f7644e829c52e1ccbc1e2509@sentry.xxx.xxx.net/12',
  // 集成,sentry 有默认的集成器,也有专门的二次封装。一般主流框架语言都有提供对应的封装
  integrations: [new Integrations.Vue({Vue, attachProps: true})],
});
2
3
4
5
6
7
8
9
10
11
12
13
14
15
16
所以到这里就结束了么?不,针对实际项目我们还要考虑几点契合项目的。
- 源代码映射(sourcemap)
- 自定义上报
- 上报的全局作用域内提供基础信息
- 临时作用域
# Sentry上传SourceMap映射
# 开启打包生成SourceMap
webpack 里面有十二种sourcemap,不同规格的代价不一样(构建速度),
我们开发模式不上传,只针对线上,所以越详细越好,用的是devtool: 'source-map'(涵盖了行列的信息)
- 十一种sourcemap详情可以看:webpack devtool
# 上传SourceMap
sentry针对代码映射提供了两种方式上传sourcemap,这里我们说说@sentry/webpack-plugin的姿势
- sentry-cli手动上传(此处不用,要接入CI/CD更希望能自动)
- webpack插件
@sentry/webpack-plugin
# 配置Webpack Plugin
温馨提示:
const SentryPlugin = require('@sentry/webpack-plugin');
const webpackPluginArr = [];
if (process.env.NODE_ENV === 'production') {
  webpackPluginArr.push(
    new SentryPlugin({
      release: env.assetsSubDirectory, // 这里的版本需要和客户端 senty 初始化的 release 一致,才能一一关联映射
      urlPrefix: env.assetsPublicPath, // 这里的前缀是线上静态资源引用路径,默认是~/
      include: './dist', // 上传哪个文件夹下面的 sourcemap
      ignore: ['node_modules', 'vue.config.js'], // 忽略上传的范围
    }),
  );
}
2
3
4
5
6
7
8
9
10
11
12
# 上传到哪里
sentry有.sentryclirc这个文件来指定上传到哪里
[defaults]
url= #上传的 sentry 服务器
org= # sentry 里面的 team
project=# team 下面的 project

[auth]
token= #ak,管理员生成的,赋予上传工具可以读项目相关信息,写项目SourceMap(比如强行覆盖)
2
3
4
5
6
7
8
9
看到auth->token, 有些人第一想法就是很懵,这个在Sentry服务生成(管理员权限,普通成员没有写入权限)

# 删除sourcemap
上传默认是上传到Sentry部署的服务器,所以怕部署到生成服务器暴露源码的问题,在打包成功时侯把对应目录下的sourcemap删除即可
最简单的姿势,就如下了(用的rimraf模块)
  "scripts": {
    "dev": "cross-env vue-cli-service serve",
    "build": "cross-env vue-cli-service build",
    "build:stg": "cross-env H3_ENV=stage npm run build",
    "build:release": "cross-env H3_ENV=release npm run build && npm run rm:sourcemap",
    "build:rc": "cross-env H3_ENV=rc npm run build && npm run rm:sourcemap", // 拼接到生产打包后面
    "rm:sourcemap": "rimraf dist/**/*.js.map", // 就这一行,**是代表任意层级子级
    "lint": "cross-env vue-cli-service lint",
    "test": "jest",
    "analyze": "cross-env BUNDLE_REPORT=true npm run build",
    "debugger": "node --inspect-brk  build/build.js"
  },
2
3
4
5
6
7
8
9
10
11
12
若是是想在linux服务器构建的时侯删除(不借助npm包实现),也可以实现。
  "scripts": {
    "rm:sourcemap": "node build/utils/remove-sourcemap.js",
  },
2
3
const { execSync } = require('child_process');
const path = require('path');
const process = require('process');
const fs = require('fs');
const distPath = path.resolve(process.cwd(), './dist');
console.log('distPath: ', distPath);
const colors = require('colors/safe');

try {
  const distPathStat = fs.statSync(distPath);
  if (distPathStat && distPathStat.isDirectory()) {
    console.log(colors.green(`正在删除清除${distPath}目录的js sourcemap文件`));
    execSync(`find ${distPath} -name "*.js.map" | xargs rm -rf`).toString();
    const st = setTimeout(() => {
      clearTimeout(st);
      console.log(colors.green('成功清除dist目录的js sourcemap文件'));
    }, 300);
  }
} catch (error) {
  console.log(colors.red(error));
  process.exit(1);
}
2
3
4
5
6
7
8
9
10
11
12
13
14
15
16
17
18
19
20
21
22
23
# Sentry上报信息作用域
# 全局作用域
全局作用域的概念,就是任何一次上报都会带上这些基础信息。
我们可以在里面写入一些用户的基础信息,方便我们快速定位问题。
比如邮件,访问哪个应用,等等。
if(window.Sentry){
  window.Sentry.configureScope(function (scope) {
    scope.setUser({
      id: window.GlobalConfig.userId,
      username: window.GlobalConfig.userName,
      appCode: window.GlobalConfig.appCode || 'home',
    });
  });
}
2
3
4
5
6
7
8
9
10
# 临时作用域
临时作用域的作用就是不会持久存在,只会临时对上报内容做一层封装。
比如我们用在 axios 的拦截器中。
import { withScope, captureException } from '@sentry/browser';

// 返回拦截器
instance.interceptors.response.use(
  response => {
    return response;
  },
  err => {
    withScope(scope => {
      scope.setTags({ errorType: 'axios 拦截器' });
      captureException(err);
    });
    Promise.reject(err);
  },
);
2
3
4
5
6
7
8
9
10
11
12
13
14
15
# Sentry推送钉钉
Sentry 官方目前没有提供针对钉钉推送的插件,只有社区提供的。
Sentry的插件可以基于 python 实现,所以第三方实现不少,我们可以这样开启。
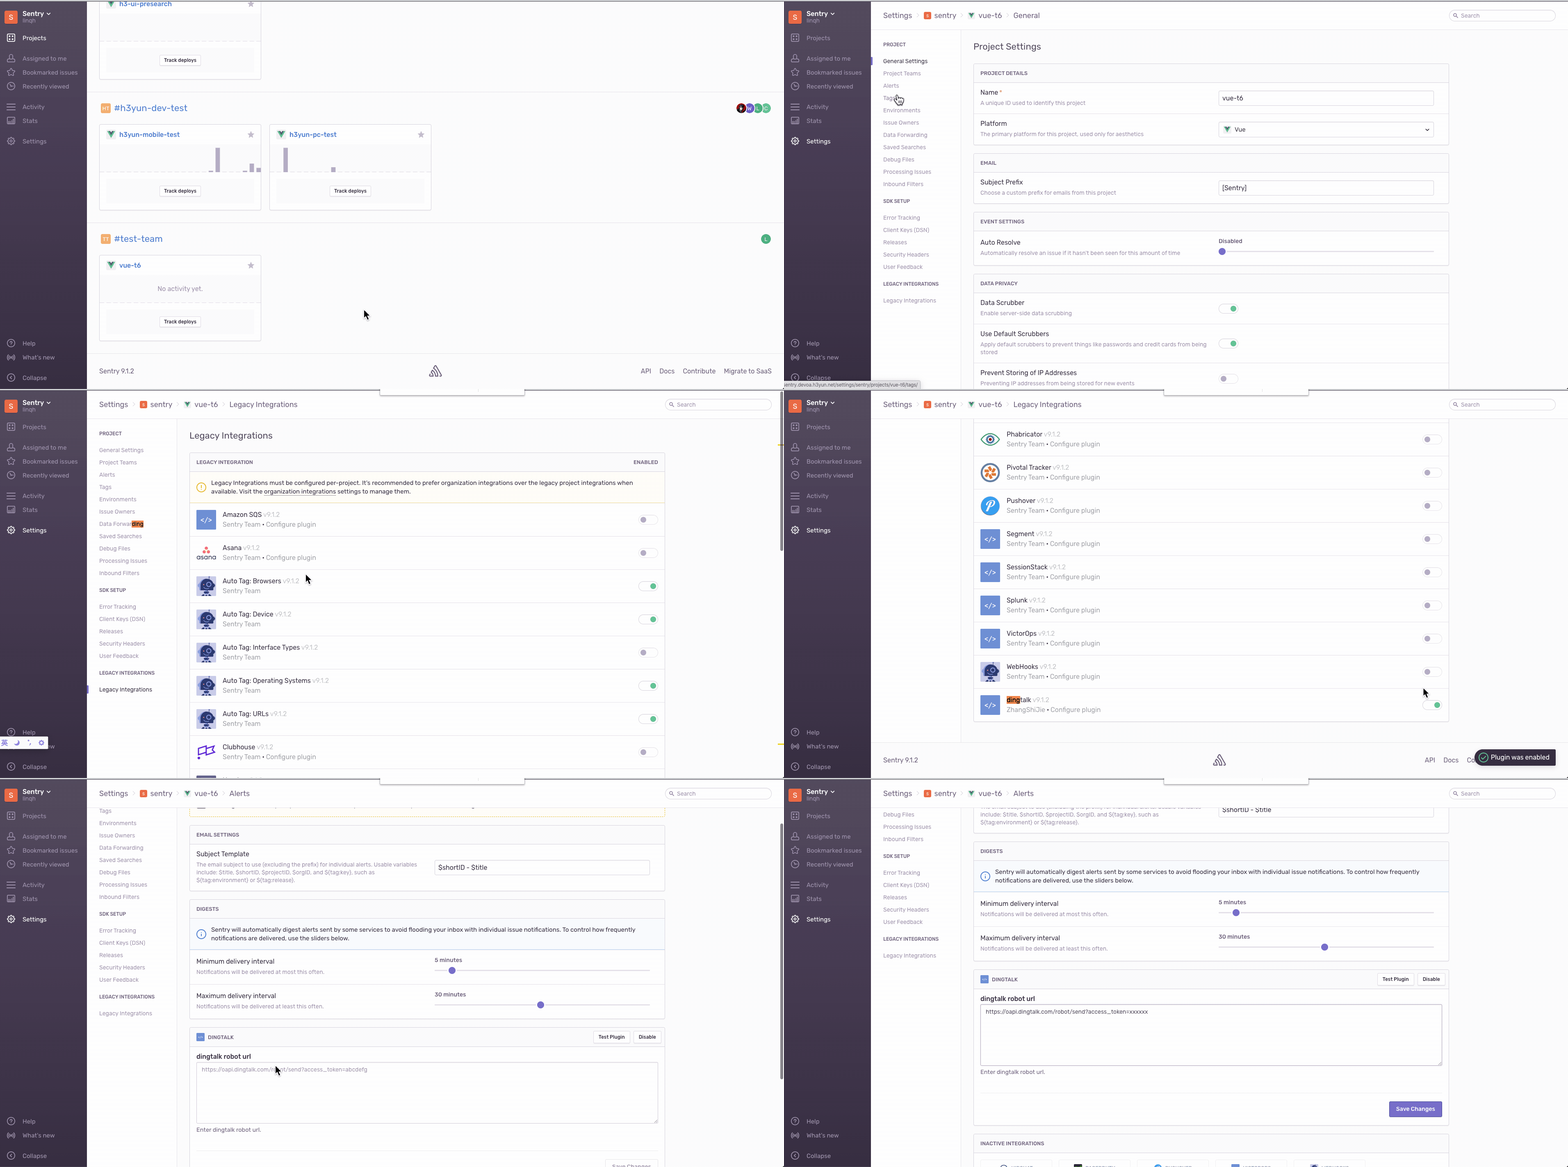
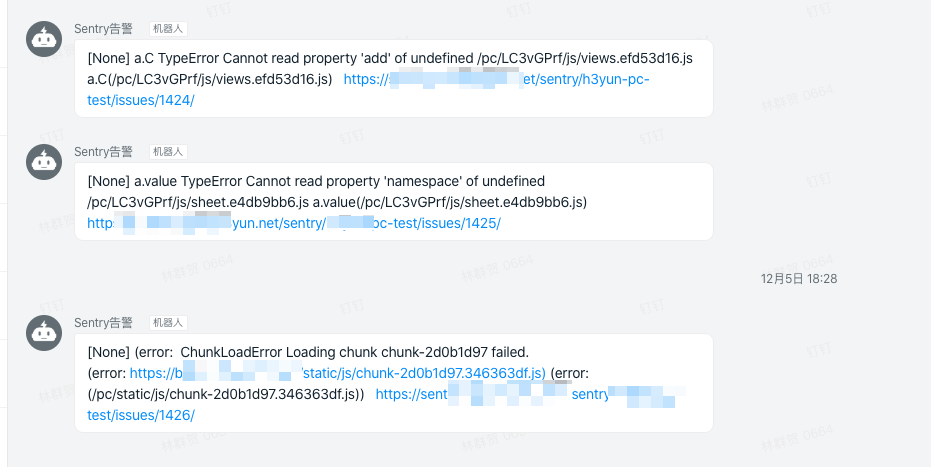
最后推送到群的效果图如下
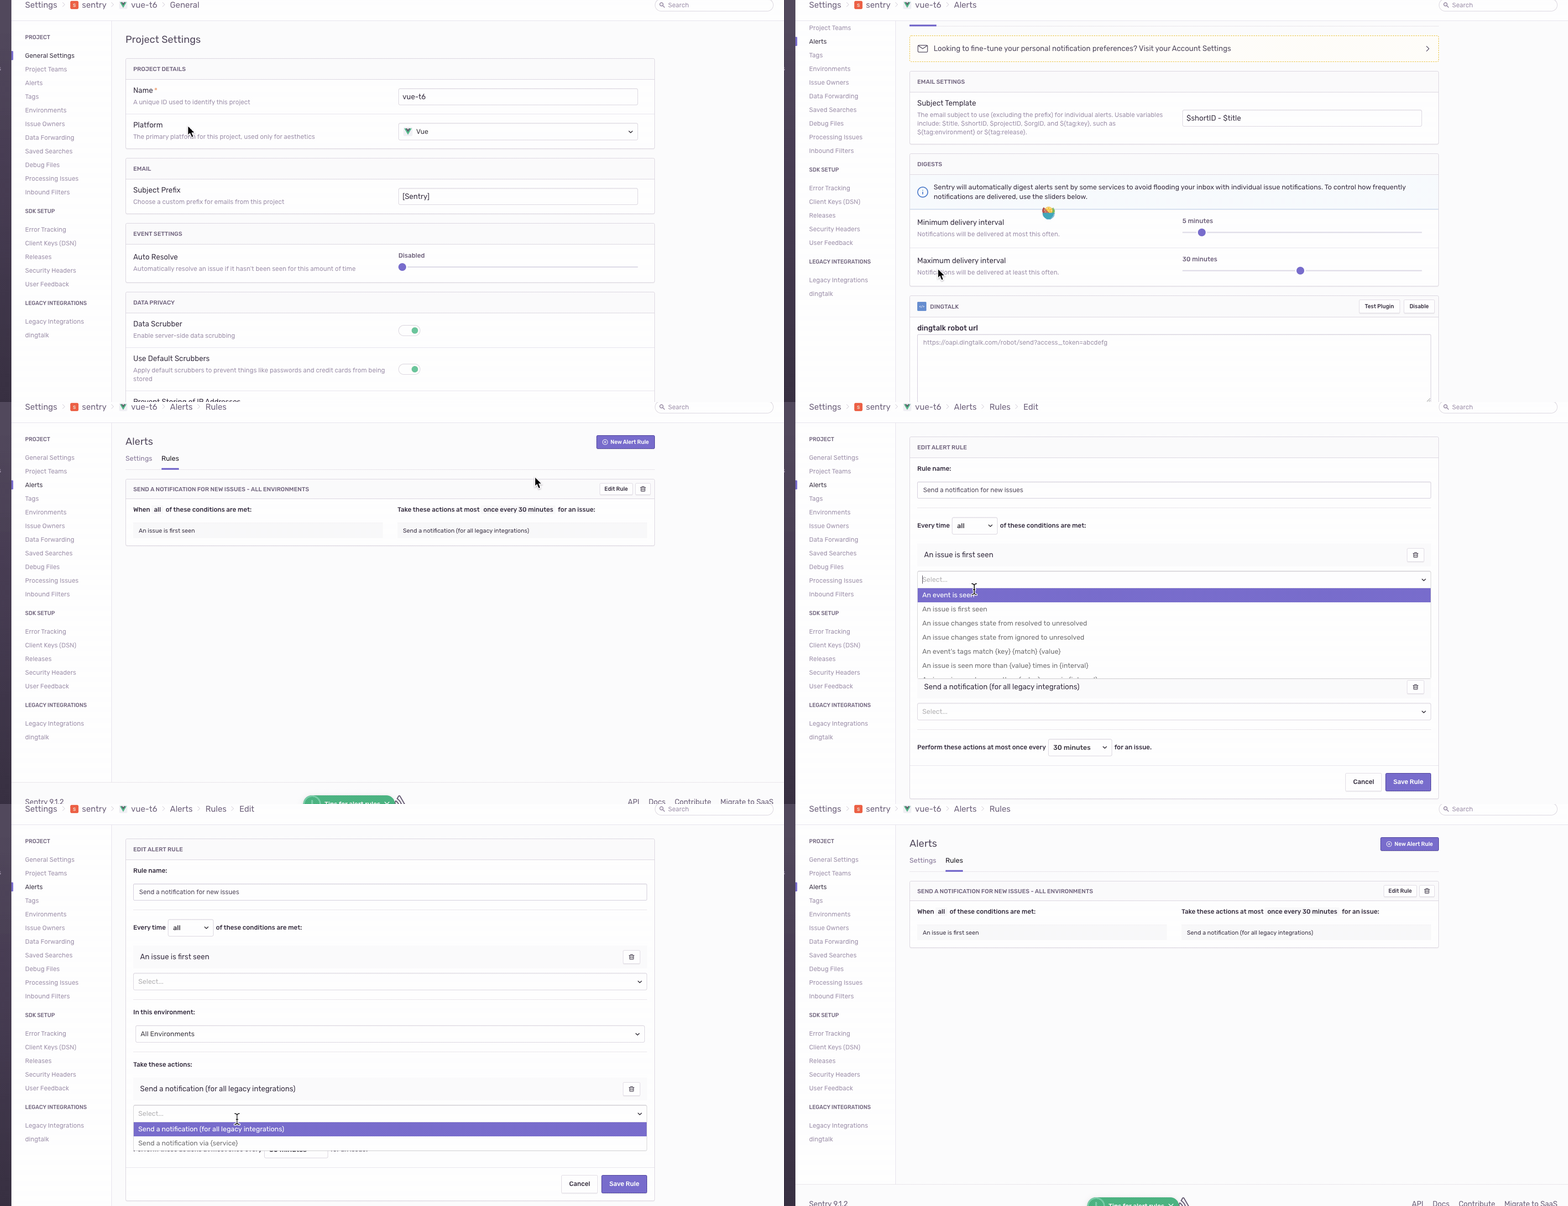
# 推送频率控制
频率可以设置阀值,还可以根据规则来指定推送什么类型的,时间段内多少人触发了再推送等等。
# Sentry客户端Vue插件
在Vue中,我们可以把客户端的初始化写成一个插件,注入到 vue 的原型链中。
方便我们其他地方主动上报,使用this.$sentry这种姿势。
此处的
import * as Sentry from '@sentry/browser';
import * as Integrations from '@sentry/integrations';

export default {
  install (Vue) {
    if (process.env.NODE_ENV === 'production') {
      const sentryDsn = process.env.H3_ENV === 'release'
        ? 'https://xxxxx.net/6'
        : 'https://xxxxx.net/9';
      Sentry.init({
        dsn: sentryDsn,
        release: process.env.ASSETS_DIR,
        integrations: [new Integrations.Vue({ Vue, attachProps: true })],
      });
    }
    Vue.prototype.$sentry = Sentry;
    if (Sentry) {
      Sentry.withScope((scope) => {
        scope.setTag('sentryInit', '成功');
        scope.setLevel(Sentry.Severity.Info);
        Sentry.captureMessage('Sentry 已经接入');
      });
      // 监听promise
      window.addEventListener('unhandledrejection', err => {
        const st = window.setTimeout(() => {
          window.clearTimeout(st);
          Sentry.withScope(function (scope) {
            scope.setTag('errorType', 'unhandledrejection');
            scope.setLevel(Sentry.Severity.Error);
            Sentry.captureException(err);
          });
        }, 0);
      });
    }
  },
};
2
3
4
5
6
7
8
9
10
11
12
13
14
15
16
17
18
19
20
21
22
23
24
25
26
27
28
29
30
31
32
33
34
35
36
37
# try..catch自动上报
借助社区的一个 babel 插件babel-plugin-try-catch-error-report
在 babel.config.js 里面配置下即可启用
module.exports = function () {
  return {
    presets: [
      [
        '@vue/app',
        {
          modules: false,
          targets: {
            browsers: ['> 1%', 'last 2 versions', 'not ie <= 8'],
          },
        },
      ],
    ],
    sourceType: 'unambiguous',
    plugins: [
      [
        'babel-plugin-try-catch-error-report',
        {
          expression: 'window.Sentry.captureException',
          needFilename: true,
          needLineNo: true,
          needColumnNo: true,
          needContext: true,
          windowProperty: ['window.location.href', 'navigator.userAgent'],
          exclude: ['node_modules'],
        },
      ],
    ],
  };
};
2
3
4
5
6
7
8
9
10
11
12
13
14
15
16
17
18
19
20
21
22
23
24
25
26
27
28
29
30
31
# axios拦截器上报
/**
 * @description 公用请求方法 powered by axios
 * @author xulingzhi
 * @todo 整个文件需要重构,去除多余的套件许可的权限判断
 */

import Axios, { AxiosRequestConfig } from 'axios';
import { baseUrl, isProductionMode } from './env';
import { withScope, captureException } from '@sentry/browser';

const DATA_PARAM_PREFIX = 'PostData'; // 请求统一前缀管理

const instance = Axios.create();

instance.defaults.baseURL = `${window.location.origin}${baseUrl}`;
instance.defaults.headers = {
  'Content-Type': 'application/x-www-form-urlencoded',
};
// 请求格式转换
instance.defaults.transformRequest = [
  function transform (data) {
    let ret = '';
    // 正常携带PostData的webForm请求处理
    if (typeof data[DATA_PARAM_PREFIX] !== 'undefined') {
      const dataObj = JSON.parse(data[DATA_PARAM_PREFIX]);
      data[DATA_PARAM_PREFIX] = JSON.stringify(
        Object.assign(dataObj, { IsMobile: true }),
      );
      ret = `${DATA_PARAM_PREFIX}=${data[DATA_PARAM_PREFIX]}`;
    } else {
      // 处理登录的特殊情况
      for (const key in data) {
        if (Object.prototype.hasOwnProperty.call(data, key)) {
          if (data[key]) {
            ret += `${encodeURIComponent(key)}=${encodeURIComponent(
              data[key],
            )}&`;
          }
        }
      }
    }
    return ret;
  },
];

// 请求拦截器
instance.interceptors.request.use(
  config => {
    const data = config.data;
    // 处理get请求querystring的特殊情况
    if (config.method === 'get') {
      if (data[DATA_PARAM_PREFIX] === undefined) {
        config.url = `${config.url}`;
      } else {
        config.url = `${config.url}?${DATA_PARAM_PREFIX}=${
          data[DATA_PARAM_PREFIX]
          }`;
      }
    }
    return config;
  },
  err => {
    withScope(scope => {
      scope.setTags({ errorType: 'axios 拦截器' });
      captureException(err);
    });
    Promise.reject(err);
  },
);
// 返回拦截器
instance.interceptors.response.use(
  response => {
    return response;
  },
  err => {
    withScope(scope => {
      scope.setTags({ errorType: 'axios 拦截器' });
      captureException(err);
    });
    Promise.reject(err);
  },
);

export default instance;
2
3
4
5
6
7
8
9
10
11
12
13
14
15
16
17
18
19
20
21
22
23
24
25
26
27
28
29
30
31
32
33
34
35
36
37
38
39
40
41
42
43
44
45
46
47
48
49
50
51
52
53
54
55
56
57
58
59
60
61
62
63
64
65
66
67
68
69
70
71
72
73
74
75
76
77
78
79
80
81
82
83
84
85